Combat Probing
Once a battle is over and won, more often than not some hostiles remain intact. This is undesirable. Many will have initiated warp when their Fleet Commander has decided the battle is unwinnable, and told them to get to a safespot and remain there until your fleet leaves.
Or, your fleet is waiting on a gate, and a ship warps in. At 260km away, the only chance your fleet has of catching him is for an intercepter to burn at him for 40 seconds and hope that he doesn't simply leave in that time.
These two situations are exactly what a Combat Prober is designed to deal with. You are a hunter of content that is normally out of reach. The better you get, the more content you can find for everyone.
Unfortunately, there really are no super-secret tricks to Combat Probing. Or if there are, I know none of them. It's primarily a case of being willing, having persistence and being as stubborn as a mule. And having a set of lungs to yell for backup.
Things that all good Brave Newbies should have in abundance.
Ships to use
As a Combat Prober your job is to not only to find a hostile ship in space, but to be capable of tackling it before it can warp away and hold it long enough for backup to arrive.
Unfortunately this means that the best line of probing ships in the game, Covert Ops, are not a viable choice for this. While extremely effective at probing, they are not ships designed for survival while under fire. They’re slower, both in top speed and agility, and have a significantly larger signature radius than their T1 counterparts. They’re also far too expensive for just how easy they are to take out.
On the other hand a T1 probing frigate such as the Probe or the Heron is cheaper, faster, more agile, fits a medium shield extender and even comes with a drone bay, meaning you can really afford to get in there and tackle.
Each of the below fits cost less than 2,500,000 isk each, and should be fitable with Level 4 skills. If you have trouble with fittings, try removing a Nanofiber and put either a Micro Auxiliary Power Core I or Co-Processor I on instead.
| Amarr |
|---|
[Magnate, Throwaway Prober] Nanofiber Internal Structure I Nanofiber Internal Structure I Micro Auxiliary Power Core I [Empty Low slot] 5MN Y-T8 Compact Microwarpdrive Medium Shield Extender I Initiated Compact Warp Scrambler Expanded Probe Launcher I, Combat Scanner Probe I [Empty High slot] [Empty High slot] Small Processor Overclocking Unit I Small Gravity Capacitor Upgrade I [Empty Rig slot] Warrior I x8 |
| Jita Price : 1,100,000 Isk |
| Minmatar |
|---|
[Probe, Throwaway Prober] Nanofiber Internal Structure I Micro Auxiliary Power Core I Co-Processor I 5MN Microwarpdrive I J5b Enduring Warp Scrambler Medium Shield Extender I Scan Rangefinding Array I Expanded Probe Launcher I, Combat Scanner Probe I [Empty High slot] [Empty High slot] Small Processor Overclocking Unit I Small Processor Overclocking Unit I Small Polycarbon Engine Housing I Warrior I x7 |
| Jita Price : 1,500,000 Isk |
| Caldari |
|---|
[Heron, Throwaway Prober] Nanofiber Internal Structure I Micro Auxiliary Power Core I Medium Shield Extender I Initiated Compact Warp Scrambler Scan Rangefinding Array I 5MN Microwarpdrive I Alumel-Wired Enduring Sensor Booster, Scan Resolution Script Expanded Probe Launcher I, Combat Scanner Probe I [Empty High slot] [Empty High slot] Small Processor Overclocking Unit I Small Processor Overclocking Unit I Small Ancillary Current Router I Warrior I x7 |
| Jita Price : 2,200,000 Isk |
| Gallente |
|---|
[Imicus, Throwaway Prober] Micro Auxiliary Power Core I Co-Processor I Nanofiber Internal Structure I Medium Shield Extender I Warp Scrambler I 5MN Y-T8 Compact Microwarpdrive Alumel-Wired Enduring Sensor Booster, Scan Resolution Script Expanded Probe Launcher I, Combat Scanner Probe I [Empty High slot] [Empty High slot] Small Ancillary Current Router I Small Polycarbon Engine Housing I Small Processor Overclocking Unit I Warrior I x8 |
| Jita Price : 2,500,000 Isk |
Some more advanced fits can be used, such as Intercepter Probers. These require much better fitting skills, probing skills, and are much more expensive.
| Amarr |
|---|
[Malediction, Probe-Cepter] Co-Processor II Co-Processor II Co-Processor II Co-Processor II 5MN Y-T8 Compact Microwarpdrive Warp Scrambler II Medium F-S9 Regolith Compact Shield Extender Expanded Probe Launcher I, Sisters Combat Scanner Probe 125mm Gatling AutoCannon II, EMP S [Empty High slot] Small Processor Overclocking Unit I Small Processor Overclocking Unit I |
| Jita Price : 29,000,000 Isk |
Moving your probes around
This is by far the most important skill to practice. Getting your probes from over there where you don't want them, to over there where you do. And to do so in a quick and efficient manner.
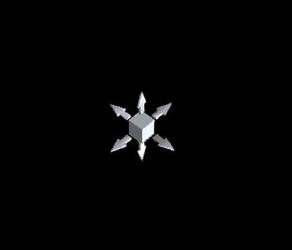
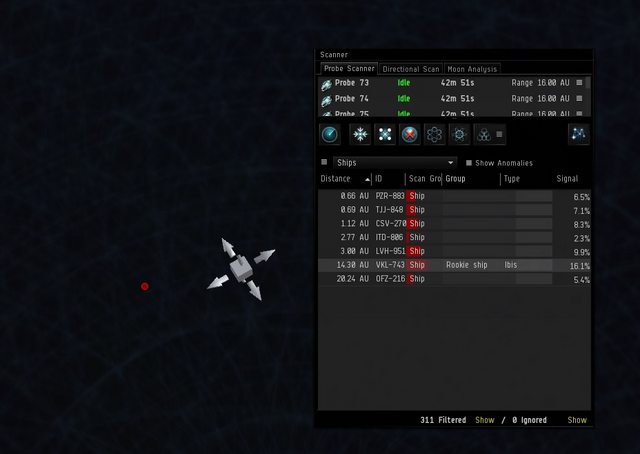
Once you’ve launched your probes into the default Pinpoint Formation, this is the icon you will use to move your probes around in space.
The six arrows can be used to move the probes on a one dimensional line. Up/down, left/right, back/forth.
The cube itself can also be clicked and moved. Which side of it you click on will determine which two dimensional plane it is moved along, as demonstrated in the video below.
https://www.youtube.com/watch?v=yI8mzflX6fE
The fastest method I've found to get the probes to where you want them, is to first get a heads down view of the solar system. Move the cube over the top of the target from your perspective, then move the camera to get a side view. Again, move the cube to what appears to be on top of your target. Zoom the camera in with the mouse scroll wheel in and make smaller adjustments.
Remember that double clicking on either a planet/station/moon or the cube itself will center your view on that object.
Below is a demonstration of this in action.
Resizing your probes
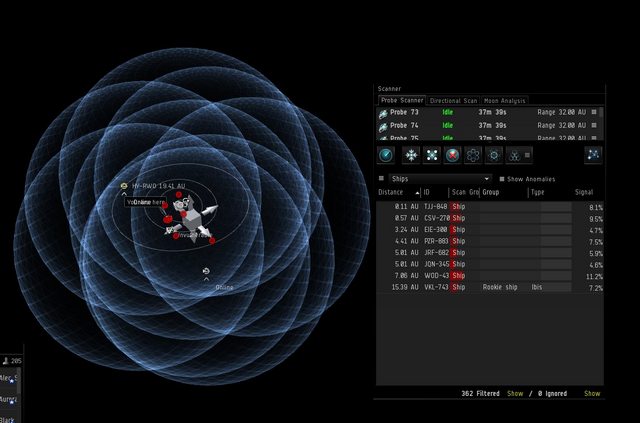
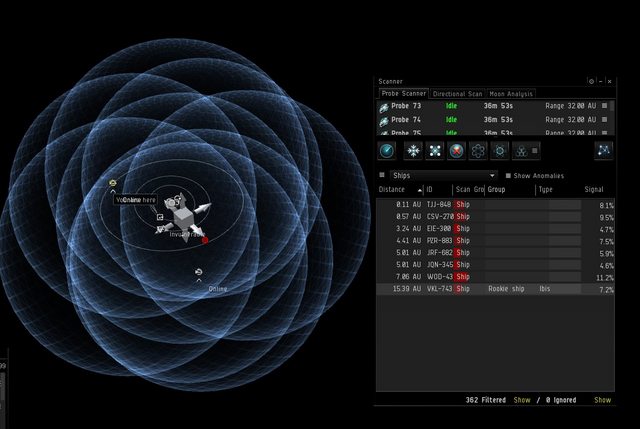
The smaller your scanning area, the better results on a target you will get. While scanning large areas might get you an idea of what's out there, you're never going to find anything without going much, much smaller. Subsequently, slowly combing the solar system with a fine toothed comb is going to get you nowhere fast.
Start out with large ranges to get an idea for a ships location, then decrease the size as you get closer.
To do this, you have two choices. You can right click on the probes in the Scanner window and select 'Resize Probe', however a much faster and more efficient way is to simply grab a hold of the blue sphere in space, and drag in or out to become smaller or larger.
https://www.youtube.com/watch?v=WnvxnJFOzrs
As you can see, this will also automatically reposition the probes to keep the formation intact.
Where to probe
While technically the amount of space a ship has to move is massive and far beyond even the furthest reaches of the solar system, functionally there is a hard limit to the area a ship can get itself.
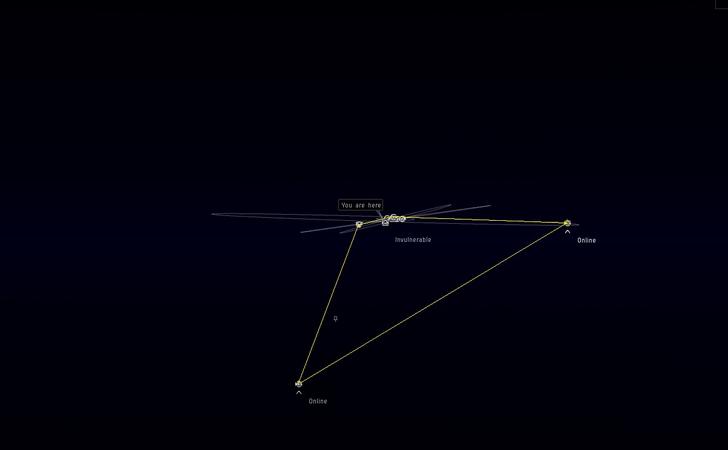
As a ship can only create a safespot between two warpable objects, any target you might be hunting will be within the reaches of the furthest celestial object in any direction.
For example in V-3YG7.
The areas inside the yellow lines are the limits of where a ship is capable of moving and creating a safespot. Outside of rare circumstances such as legacy Deep Safes or Safe Spots created using Cosmic Signatures, your target will be within this area.
Interpreting the Results
When receiving a result from a scan, there are six possible outcomes.
Getting a red sphere means that only a single probe has the target within it’s scan range. Not two or three. A single probe. Without additional points of reference from more probes, you will only receive a rough estimate of the ship’s distance from that probe.
Note that this is not telling you that there’s a ship within this sphere. Rather it is displaying that the ship is this far from the probe. Somewhere on the surface of the sphere is where the target is.
Because of the close nature of the probe setup, and that only a single probe is capable of detecting the target, it means that there’s only a small area where only a single probe is covering.
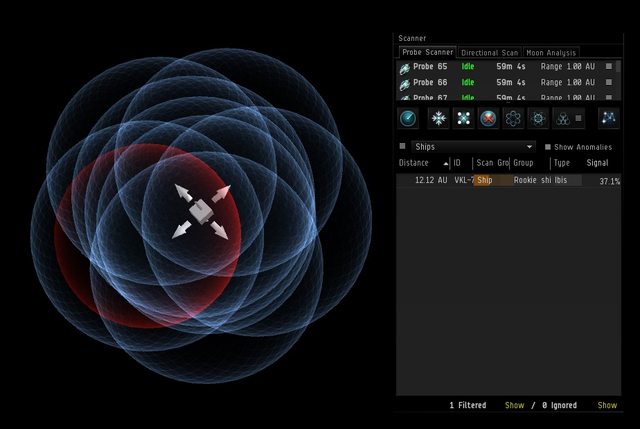
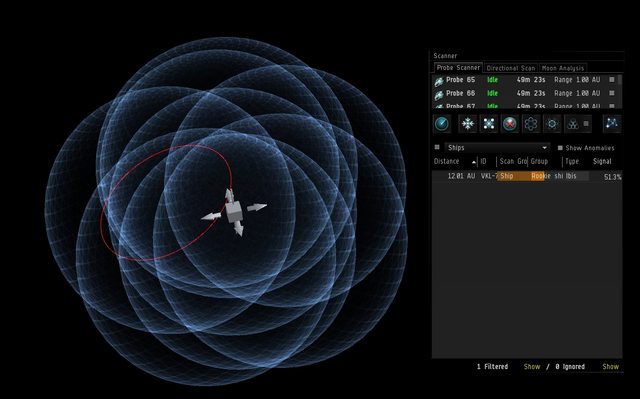
Getting a red circle means that only two probes have detected the target within their range. Like the sphere, it can only give you an idea of where to look. The target will be somewhere on this circle.
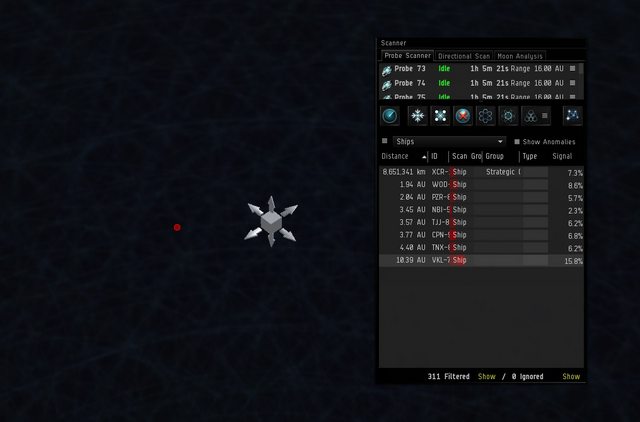
This is an Red result, where at least three probes have detected a ship. One of the most common results you’ll see. It can often be quite misleading in where the target actually is, often being off by up to multiple AUs. It also gives no information about the target as seen in the Scanner window other than it being a ship and its designated ID, in this case being VKL-743.
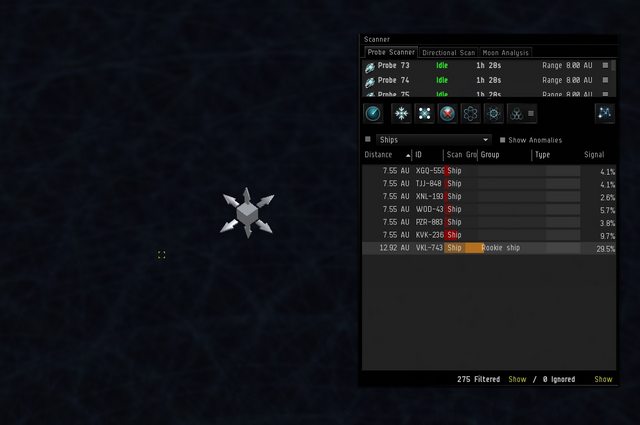
Now we're getting much closer. A Yellow result is far more accurate than a Red result, and also gives an additional piece of information about the ship, it’s Grouping. This will tell you what type of ship you’ve found, like an Attack Battlecruiser, an Assault Frigate, or a Cruiser. In this case, it’s a Rookie Ship.
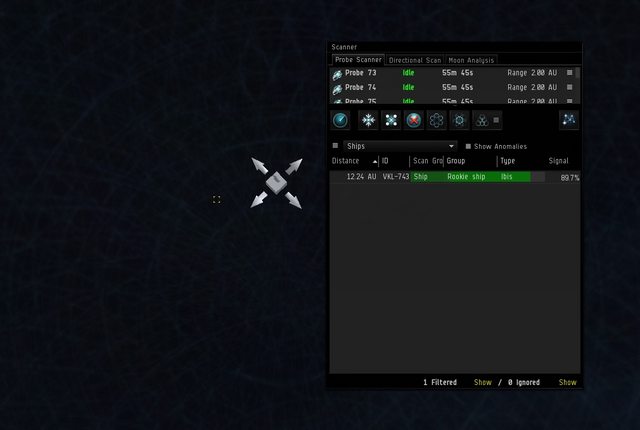
With this result, a Green Icon, you’ve pretty much found where they are. The distance you're off by is tiny compared to the area you're scanning, but not quite enough to be able to warp it. It also gives the last possible information you’ll receive out of scanning, the exact ship type. In this case, it’s an Ibis.
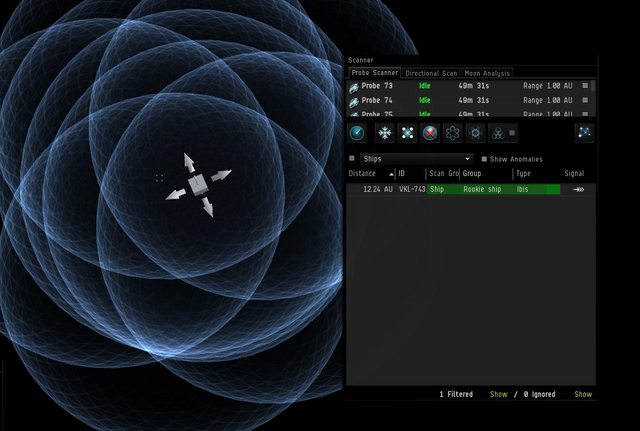
The icon in space has turned Green and the percentage under Signal has changed to a Warp button. You’ve found your target. Click the button to Warp to 0 or you can right click to find Squad Warp or Warp at range options.
When probing down a target, you might lose him as you’re closing in to either a mistake or the target warping off. However, once you’ve gotten your probes accurate enough to get either the Grouping or Type on a target, no matter how inaccurate your following scans are the computer will remember the information already gathered about a result, making it that much easier to follow said target in a crowded system. This can be seen in the video Probing Example - Ishtar at the end of the Wiki.
In this example, the computer will remember that ID VKL-743 is a Rookie Ship / Ibis.
Also remember when the system is filled with ships, that clicking on a particular result in the Scanner window will cause the results in space to only display that one.
This will clear up much of the clutter, and let you focus on that particular target without outright filtering other potential hostiles.
Landing on a Target
You've found him. Now you need to grab him.
At this point, it's just like your average Hero Tackle. Target the enemy, hit Micro Warp Drive, attempt to apply your Warp Scrambler, put yourself in a close orbit, and yell for help.
Many ships that you'll be probing down are not sitting idle. They'll be moving in one direction or another, so the distance between your landing point and your target might be anywhere from 2km to 20km. As this is the case, having Thermodynamics trained and your Warp Scrambler and Micro Warp Drive preheated while in warp is not a bad idea.
Remember to turn off overloading after you've caught them. Burning out the scrambler and letting him warp off does no-one any good.
When yelling for help, remember that the FC may not know who you are. Yelling out "I've got him tackled" means little to a player who has 60 other individuals in his fleet. Clearly refer to yourself in the third person so everyone knows who the warp in is. This is clearly shown in my videos at the end of the Wiki, namely "Warp Shade, warp Shade!"
Filtering out friendly ships
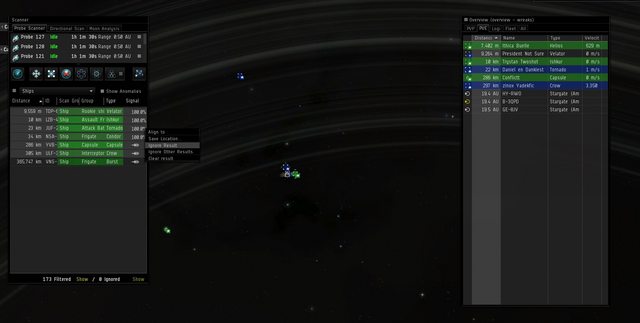
In this example, everything on grid is friendly. As generally the size of a grid around a gate or station is around 300 to 400 kms, that means that anything within that range can be safely considered something you don't want to show up on your results.
Probing once over your own fleet will get you a long list of ships within grid range, giving an easy and quick way to remove these ships from cluttering up results of things that you do want to find. Use shift click to select anything between 0m and 400km, right click, and select 'Ignore Results'. For as long as you and they remain in space and in system, they will no longer show up as a result.
Another option if hunting a specific ship, is to use 'Ignore Other Results'. This will filter out all other results shown, leaving only the chosen one to be probed.
If someone you've filtered out leaves system, it is reset, and that person will no longer be filtered. If you leave system, everything is reset.
Always be ready to probe
If there are hostiles in system have your probes out, and have the probing window up and ready. Time is of the essence when trying to get a warp in on a hostile, and the quicker you can get into warp to them, the more likely you are to catch them. Probes will also automatically return to your cargobay if you leave system or dock up, so there’s little reason not to have them out on system jump in.
Try and keep in mind what your role is. You’re a prober first, fast tackle second. It’s easy to get caught up in the heat of battle, but try to keep yourself alive to find to catch targets after a battle that would normally be completely out of reach of the fleet.
Probe over your own fleet's location
When there are hostiles in system, people will generally do one of two things to work out if a gate is safe or not. Either warping to the planet near the stargate or one of it’s moons, or to a tactical around the gate. Both of these actions are considered be pretty safe.
If you’ve got probes around the gate and can pinpoint them within a few seconds, it quickly becomes an unsafe thing for a hostile to do. You can see this in the Probing Example - Naga video at the end of the Wiki. If spending any amount of time on a gate, have your probes out and constantly probing said gate and ready to warp to any new contacts.
Also, while warping to a new gate with the fleet, move your probes to your destination while in warp. Hostiles that are gate camping may have simply warped up to a tactical to keep an eye on the gate. They’re not going to expect for a prober to land on gate, then suddenly warp to them.
When doing either of these, keep your scan range at 0.5AU. That is more than enough to encompass the gate and any moons around it, and will have the greatest probing strength.
Probing will not Catch Everything
The ease or difficulty in probing down a ship depends on two factors. It’s Sensor Strength and it’s Signature Radius.
A higher Signature Radius and a smaller Sensor Strength will make a target easier to find. The reverse makes a target more difficult to find. Some ships like Electronic Attack Frigates and Stealthbombers have both a naturally small Signature Radius and a high Sensor Strength, meaning they can be very difficult to pinpoint. Or even impossible with some prober fits.
Don’t worry about it. You can’t catch everything.
Also, if a target is aware they’re being probed they might constantly jump safespots. A constantly warping target in nearly impossible to catch, as by the time you’ve probed down their spot and warped yourself or your fleet there, they’ve already entered warp to a new location.
When this happens, try it a few times, but use your head in determining if it's a catchable target, or it's a bust. Simply let the FC know that you are unable to catch the target when you call it off.
Random Tips
- When probing a hostile ship on grid, use 'C' to turn on your automatic camera control while selecting the target in space. This will orientate your camera towards them allowing you to pre-align for an instant warp when the probes finish.
- Create a Custom Formation of the default Pinpoint Formation set to 0.5 AU. This is a very common setting for your probes, and can save precious seconds.
- You can save the spot on the scanning interface once you have succesfully scanned down a ship even before warping to it. This is especially usefull when you are on grid with the hostiles you are scanning becouse otherwise you cant tell where you will warp exactly before committing. This way you will also have a potentially usefull spot for later. Remember to rescan often if you are just waiting for the right moment.
Probing In Action
I've put up a few poorly edited videos of my own probing efforts. Calling these examples of perfect probing would be horribly misleading. I make silly mistakes, get distracted, and miss warps. But they should serve to show the probing system in action.
Probing Example - Naga https://www.youtube.com/watch?v=2B1FVVX0KdI
Probing Example - Ishtar https://www.youtube.com/watch?v=eejUW9OzW78
Probing Example - Golem, Nightmare https://www.youtube.com/watch?v=wjeCUj03GeQ
